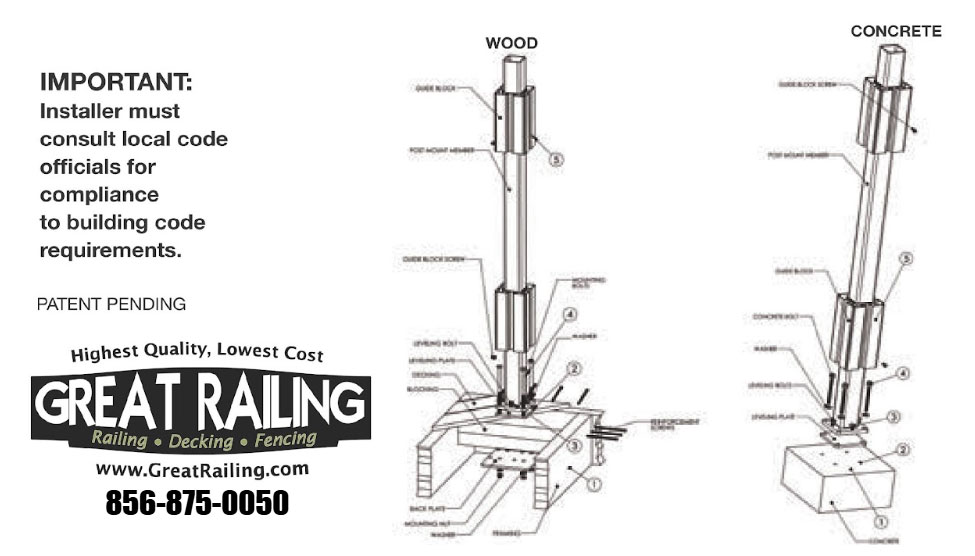
BLU-MOUNT™ Post Mount Installation Instructions
Step 1
a. Lay out the location of the post.
b. Wood Only – Install at least 3″ of blocking under the mounting location. Securely attach the blocking using reinforcement screws.
Step 2
a. Using the leveling plate as a template, mark the locations of the 4 mounting holes to be drilled.
b. Concrete Only – Drill 4 holes into the concrete using a 1/4″ diameter masonry drill bit. The hole must be drilled to a minimum
depth of 3-1/2″
b. Wood Only – Drill 4 holes through the decking and blocking using a 3/8″ diameter drill bit.
c. Clean out the holes of all dust and debris.
Step 3
a. Install the 4 leveling bolts into the post mount member.
b. Place the leveling plate on the concrete or decking surface, as appropriate, and align over the drilled holes.
c. Place the poat mount member on top of the leveling plate and align the 4 holes.
d. Adjust the leveling screws to ensure the post mount member is level.
Step 4-Concrete Only
a. Install the 4 concrete bolts with washers, as shown, by applying downward pressure while turning in a clockwise direction.
b. Continue to tighten the bolts until the heads are firmly seated. (Do not over tighten.)
Step 4-Wood Only
a. Install the 4 mounting bolts with washers, as shown.
b. On the underside, place the back plate over the exposed mounting bolts. (use the centered holes for in-line applications and
the offset holes for comer applications.)
c. Secure the back plate by using the supplied mounting nuts and washers.
Step 5
a. Install the two guide blocks onto the post mount member. They should be positioned so that the screws from the railing
brackets will screw into the guide blocks
b. Once the proper heights are established, drill a 3/16″ diameter hole through both the guide block and the post mount member.
Install the supplied guide block screws to hold the guide blocks in place.
Step 6
a. Install the post profile and rail brackets according to manufacturer specifications.